4.7. Queues
4.7.1. Introduction
Queues are Print-in channels for acquiring SafePages.
Note
Rate Limiting is applied to unauthorized access and invalid requests.
4.7.2. Queue List
After a tap on the Queues button in the main menu this panel is shown. See Menu.
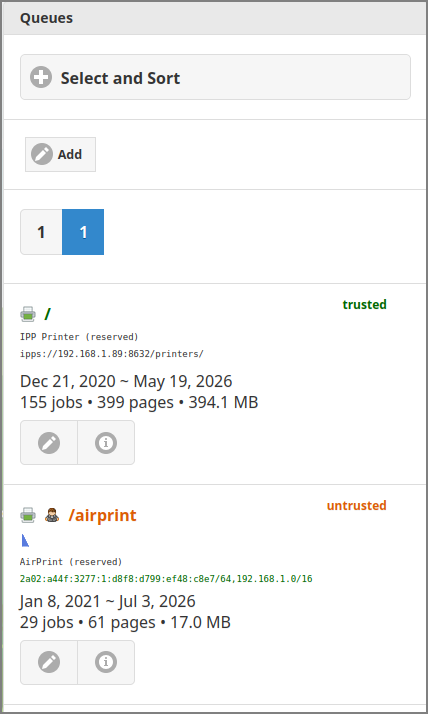
Admin Web App: Queue - List
All non-deleted queues are listed alphabetically by default. A different selection and sorting can be entered: see Admin Web App: Queue - Select and Sort.
Press the New button to create and edit a new queue.
The list can be traversed by tapping one of the buttons at the pager at the top or bottom of the page.
An entry is displayed for each queue, with identifying data and some usage statistics. From top to bottom:
The queue’s trust or status (at the top right corner).
The URL Path of the queue. The path is relative to the /printers URL base.
An inline Line-Graph showing the day pagometers of the printed pages over the last 30 days.
The full IPPS URL variant of the queue.
SavaPage takes the first IPv4 address of the first network interface on the server platform as URL host. You can overrule this behavior by setting a fixed IPv4 address or DNS name in configuration item
system.server.dns-name.
Optionally, the allowed client IPv4 and/or IPv6 addresses as a CIDR Set.
The period in which activity was accumulated on the pagometer.
The pagometer of the queue including the number of jobs and bytes printed.
Tap the Edit button to change or delete the queue. See Edit Queue
The Log button brings you to the list of documents printed to the queue. See Admin Web App: Document - List
Note
Due to Admin Privileges certain buttons might not be visible.
Tip
The pagometers of all queues can be reset at Options > Advanced > Reset Pagometers
When applicable, the following icons are shown:
|
IPP Printer Queue. |
|
Basic Authentication enabled.
|
|
Queue Journal enabled.
|


4.7.2.1. Queue Journal
The Queue Journal is the doc.store.journal.in.print branch of the
Document Store.
It must explicitly be enabled.
4.7.2.2. Select and Sort
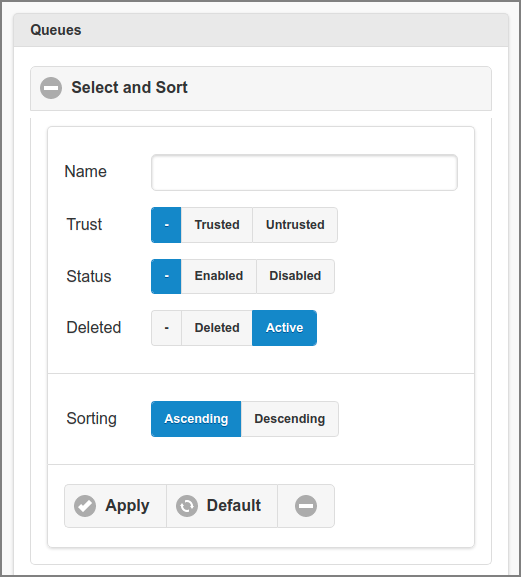
Admin Web App: Queue - Select and Sort
Queues can be selected by entering the containing text (fragment) of their URL Path Name.
Select the queue’s Trust and (Deleted) Status. The – button will select both option values.
The list can be sorted Ascending or Descending on URL Path Name.
Tap the Apply button to (re)display the list.
A tap on the Default button resets the selection and sort fields to their default values.
4.7.3. Edit Queue
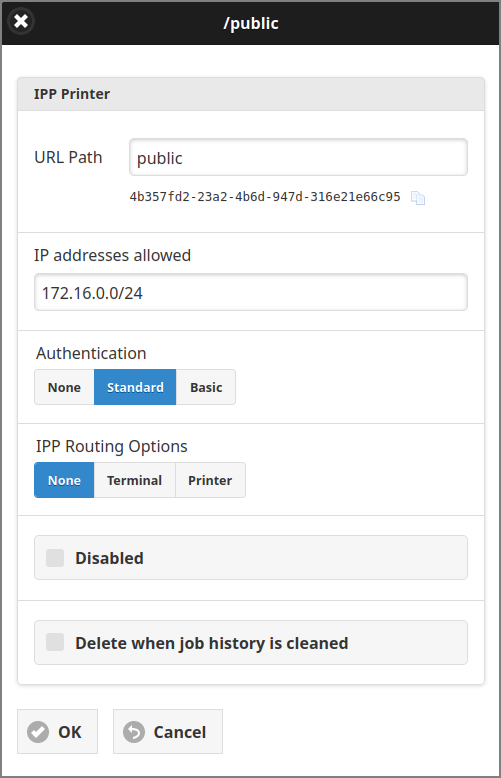
Admin Web App: Queue - Edit
The URL Path is editable for non-reserved queues. Renaming the URL path name will permanently overwrite the old name in all related job history records with the new name.
In response to an IPP Get-Printer-Attributes request the “printer-name” and “printer-make-and-model” are returned as “SavaPage-urlpath”. So, in this example the IPP printer-name will be “SavaPage-public”. The UUID of the Queue, in this case
4b357fd2-23a2-4b6d-947d-316e21e66c95, is used for IPP attribute “printer-uuid”.
Enter IPv4 and/or IPv6 address ranges as a CIDR Set at IP addresses allowed to restrict access to the queue based on requesting IP address. If the field is empty all requesting IP addresses from private networks are allowed to print to the queue [6] . See HTTP XFF Header Settings.
For Authentication, select the None option to make this a Trusted Queue. If this option is not selected, the queue will be a Public Queue with Standard IP Based Authentication or Basic Authentication.
IPP Routing Options are discussed in the section below.
Tick the Disabled checkbox to disable access to the queue for all users.
When the Queue Journal function is enabled it can be Disabled for this queue. See Document Store.
Tick the Delete checkbox to delete the Queue. This will be a logical delete as long as related job history is present. Any logical deleted Queue will be physically deleted from the database when no related job history is present anymore. This situation will automatically occur when you enabled automatic backup in combination with the delete of old document logs. See Backups.
Press the OK button to commit the changes and return to the Queue List.
The Cancel button brings you back to the Queue List without changing anything.
Important
Some reserved queues like Web Print and Mail Print can not be edited. Other reserved queues like AirPrint and Internet Print are untrusted by nature, hence Authentication None cannot be selected.
Note
IPP printing from public IP addresses is denied by default. You can override this behavior by setting specific public IP address ranges at IP addresses allowed.
4.7.4. IPP Routing
With IPP Routing the PDF of incoming PostScript documents on a non reserved and driver-print Queue is routed to a Proxy Printer. There are two options for referring to this printer:
Terminal : refers to the Single Printer Target in the Custom Proxy Print of the Terminal that matches the client IP address.
Printer : refers to the printer as configured in this IPP Routing dialog.
If the ipp.routing.enable configuration property and both
ipp.routing.*.enable options are enabled (see table below), the
following section appears in the Edit
Queue dialog:
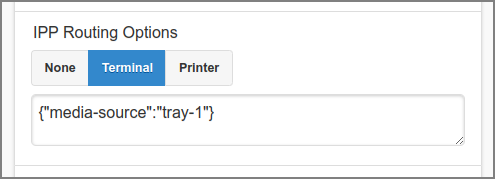
Admin Web App: Queue - IPP Routing Terminal Options
Select the Terminal option to enable “IPP Routing by Terminal” for this Queue.
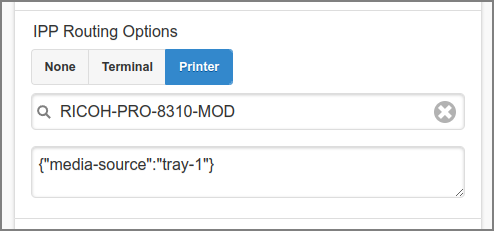
Admin Web App: Queue - IPP Routing Printer Options
Select the Printer option to enable “IPP_Routing to Printer” and enter the target printer using the quick search field below it.
Optionally enter an IPP key/value map in JSON format to override
printer defaults. In this example IPP attribute media-source is
assigned value tray-1.
Important
Use IPP attributes for routing and optionally use PPD to IPP Mappings in the printer PPD Extension File for the target printer. For example:
{"copies":"1", "media-color":"white", "print-color-mode":"monochrome",
 "sides":"two-sided-long-edge", "media":"iso_a4_210x297mm"}
Note
If IPP Routing leads to a Job Ticket Printer or to a Hold Print Mode Printer, the print job is handled accordingly.
IPP Routing Queues are marked with a small printer icon in the Queue List with an additional icon in case of an IPP Routing Printer Queue.

Admin Web App: Queue - List - IPP Routing: Terminal Queue

Admin Web App: Queue - List - IPP Routing: Printer Queue

Admin Web App: Queue - List - IPP Routing: Printer Hold Queue

Admin Web App: Queue - List - IPP Routing: Job Ticket Print Queue
For a sample screenshot of the financial transaction see User Web App: Log - IPP Routing Transaction.
Configuration property |
Description |
|---|---|
ipp.routing.enable |
Enable IPP Routing: |
ipp.routing.terminal.enable |
Enable IPP Routing to Terminal: |
ipp.routing.printer.enable |
Enable IPP Routing to Printer: |
See Config Editor on how to set these items.
Important
IPP Routing Plug-in instances are called on an IPP Routing event, just before the PDF is send to the Proxy Printer. These plug-ins edit the PDF, for example by adding a header, footer and QR code image.
4.7.4.1. IPP Routing Script - Terminal
Alice logs into a computer at the Reception.
The computer has fixed IP address 192.168.1.50
Alice prints the “Sales Report” document to SavaPage Queue
/tray1The PostScript content is received by SavaPage and converted to PDF.
SavaPage notices that …
/tray1is configured for IPP routing.The requester’s IP address 192.168.1.50 is linked to Terminal “Reception”.
Terminal “Reception” defines a Custom Proxy Print to the Single Printer Target “HP-Reception”.
SavaPage decides to print the PDF to Proxy Printer “HP-Reception”.
SavaPage notices that an IPP_Routing Plug-in instance is present. Therefore, it calls the plug-in with the print job parameters (User id “Alice”, Client IP address 192.168.1.50, CUPS printer name “HP-Reception”, Print Job Name “Sales Report”, date/time of the print) together with the PDF to be printed.
The IPP Routing Plug-in calls a RESTful service of a third-party QR code provider, passes the print job parameters, obtains the QR code in return, and draws an image of the QR-code on the PDF to be printed.
SavaPage prints the PDF as edited by the IPP Routing Plug-in to Proxy Printer “HP-Reception” using the IPP Routing Options of
/tray-1.Alice collects the printed “Sales Report” document from the “HP-Reception” printer next to her desk.
4.7.4.2. IPP Routing Script - Hold Printer
Bob logs into the User Web App to make sure he can print to untrusted SavaPage Queue
/tray2with IP Based Authentication.Bob prints the “Sales Report” document from his BYOD to
/tray2.SavaPage notices that the requester’s IP address 192.168.1.51 is authenticated and converts the PostScript content to PDF.
SavaPage notices that
/tray2is configured for IPP Routing to Printer “RICOH-PRO-8310-MOD”.SavaPage notices that “RICOH-PRO-8310-MOD” is a Hold Print Mode Printer and holds the print job using the IPP_ROUTING Options of
/tray-2.Bob walks to the “RICOH-PRO-8310-MOD” printer and swipes his NFC token along the reader next to it. As a result the held job is printed.
4.7.4.3. IPP Routing Script - Job Ticket Printer
Alice prints 100 copies of the “Event Flyer” from her BYOD to untrusted SavaPage Queue
/tray3with Basic Authentication.A dialog pops up and Alice enters her user name and password. SavaPage notices that the requester’s IP address 192.168.1.52 is authenticated, that Alice has role Job Ticket Creator and converts the PostScript content to PDF.
SavaPage notices that
/tray3is configured for IPP Routing to Printer “TICKET”.SavaPage notices that “TICKET” is a Job Ticket Printer and uses the IPP Routing Options of
/tray-3to create a Job Ticket assigned to Alice.Bob is a Job Ticket Operator in the Print Room. He notices Alice’s Job Ticket in the Job Ticket Web App, approves the ticket and prints the job to one of the printers in the room.
Alice walks to the Print Room to pick up the printed result.
4.7.5. Reserved Queues
Dedicated queues are reserved and pre-installed for:
The default IPP “
/” queue.The Raw IP Printer (Port 9100) queue “
/raw”