3.5. Print
A tap on the Printer or Ticket button in the main SafePages view shows the Print dialog. See SafePages.
If just one printer is available, it is automatically selected, and its Printer Settings dialog is opened.
Note
The Print dialog enables users to set custom printer and job options. When a single copy with default printer options is required, users can apply Fast Print Mode (when this mode is configured for a printer).
3.5.1. Printer Selection
When a printer was not yet selected a Select Printer dialog is displayed.
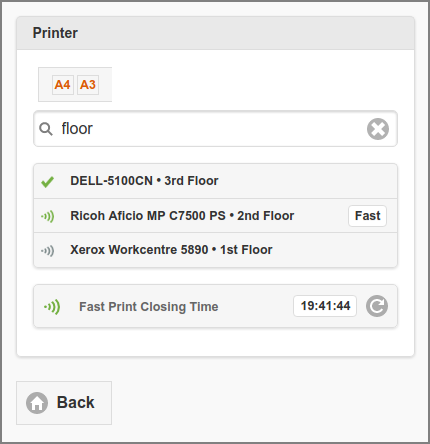
User Web App: Print - Select Printer
A list with a maximum of 5 accessible printers is shown in alphabetic order. Access is according to User Roles “Print Job Creator” and “Job Ticket Creator”.
The number of printers shown can be set in the
webapp.user.printers.quick-search.maxconfig item. See Config Editor on how to change this value.Page navigation buttons are added if more printers are available than shown.
Printers marked with an
 icon are secured with
Hold Print Mode
Release. An
icon are secured with
Hold Print Mode
Release. An  icon means the printer is secured with
Direct Print Mode
Release. Printers marked with a Fast label are (additionally) enabled
for Fast Print Mode
Release.
icon means the printer is secured with
Direct Print Mode
Release. Printers marked with a Fast label are (additionally) enabled
for Fast Print Mode
Release.Job Ticket Printer instances are marked with an
 icon.
icon.Printers can be selected by entering part of the printer name or location. In the figure above the text “floor” was entered, resulting in 3 hits.
You select a printer from the list by tapping (clicking) it. This brings the Printer Settings dialog of the selected printer into view.
The Fast Print Closing Time button shows the expiration time of Fast Print Release. The time is reset when the Print Dialog opens or the button is pushed. This button is shown when the user is granted access to at least one proxy printer with Fast Print Release enabled.
Note
When User Role permits access to Job Ticket Printers only, the dialog will show “Ticket” as title.
3.5.2. Printer Settings
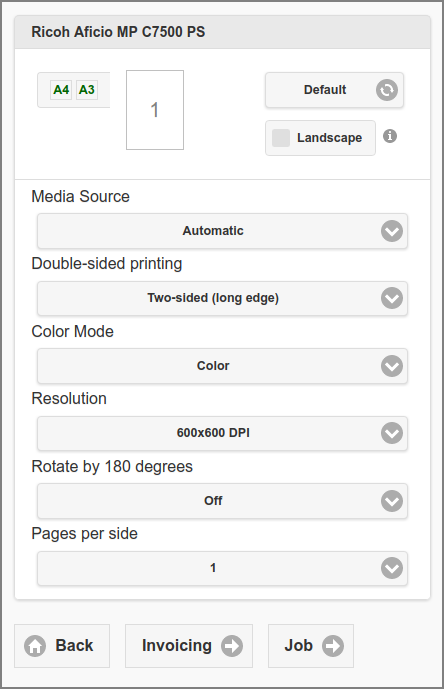
User Web App: Printer - Settings
Set one or more printing options by pushing the pick-list buttons. The options are initialized with the CUPS printer defaults at the start of a user session. Changes made in this dialog are held during a user session, unless they are cleared after a proxy print: see Print Job Settings Configuration Properties.
Options are printer specific, and are automatically identified by SavaPage. See Printer Setting Options.
A preview of the Finished Page is shown at the top. A checkbox shows the orientation (Portrait, Landscape) of the first page of the selected document or page range. See Print Preview for more information.
The Invoicing button is visible if Proxy Print Delegation is enabled and the user has Print Job Delegate role. Pressing it opens the Print Delegation Dialog.
Pressing the Job button opens the Print Job Settings.
Note
Options are validated with SPConstraint rules, when leaving the Printer Settings dialog with Invoicing or Job button.
If options present in the CUPS PPD file are missing you can add them, as explained in PPD Extensions. In this way you can add finishing options:
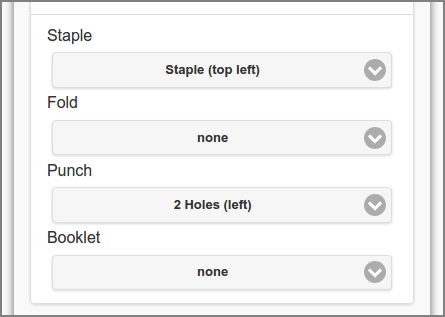
User Web App: Printer - Settings - Finishings
Or Job Ticket Options:
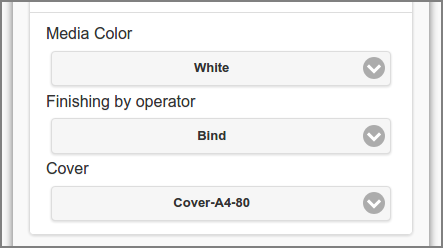
User Web App: Printer - Settings - Job Ticket
When all paper sizes of SafePages jobs are supported by the printer, each paper size is indicated in green at the top of the dialog, and the Media Source defaults to Automatic. In this example A4 and A3 are supported. See Media Sources on how media size is assigned to a printer’s media sources.
When a user selects Media Source Automatic, and the target printer supports automatic media source selection, SavaPage will use IPP
media-sourceattribute valueautowhen sending the job to the printer. In this way, even when the job is redirected to a another (compatible) printer, the right media source will be selected automatically, based on media size.
Tip
If you always want to force a print job to automatic media source
selection, irrespective from the Media Source choice, you can use a
PPD Extension to map
all media-source values to the same PPD auto value.
3.5.2.1. Page Scaling
If you choose a specific Media Source (holding a specific paper size) that does not match all paper sizes of SafePages jobs, a Page Scaling option appears, with an extra page size indicator (with light orange background) at the top of the dialog.
Also, a mnemonic text is displayed at the bottom of the Print Preview, with the media size of the chosen Media Source, optionally appended with the “fit” option, if Fit is selected.
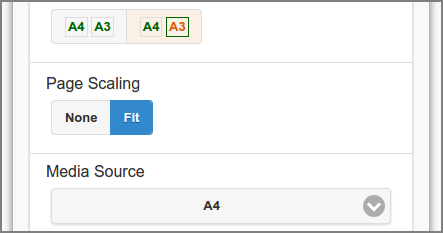
User Web App: Print - Page Scaling (Fit)
In this example, as the orange A3 indicator shows, the selection of the A4 media source does not fit available A3 page sizes.
The default option Fit (indicated as solid green square) will
scale the deviant pages according to the
print-scaling option fit.
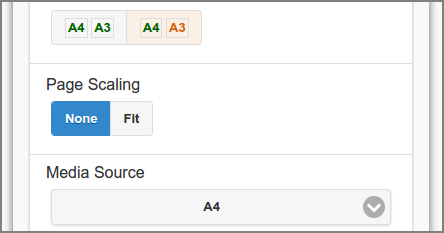
User Web App: Print - Page Scaling (None)
The None option (indicated as solid white square) will scale the deviant pages
according to the print-scaling
option none.
If printed media of document(s) do match the assigned media of the (implicitly) selected Media Source, the Page Scaling choice is not shown, and option “None” is applied.
Note
If the print-scaling option is restricted to none, the Fit
option is not shown. See
print-scaling.
Scaling defaults can be overruled with configuration items shown in the table below:
Configuration property |
Description |
|---|---|
webapp.user.proxy-print.scaling.media-match.show |
Set to |
webapp.user.proxy-print.scaling.media-match.default |
Default Page Scaling value when media sizes match assigned media
of selected media source. Values: AUTO` (default), |
webapp.user.proxy-print.scaling.media-clash.show |
Set to |
webapp.user.proxy-print.scaling.media-clash.default |
Default Page Scaling value when media sizes do not match assigned media
of selected media source. Values: |
See Config Editor on how to set these items.
3.5.2.2. Print Preview
Print Preview helps the user to envision the effect of Pages per side, Rotate by 180 degrees, Staple and Punch on the Finished-Page.
A checkbox at the top right shows the orientation (Portrait, Landscape) of the first page of the selected document or page range.
This is the right default in most cases, but the value can be toggled if the user knows for sure that the first page has a different orientation. For example, because he selects a specific page range from SafePages document(s) that have mixed page orientation.
Whatever the choice is, SavaPage always checks if the assumption was right. If the actual print orientation turns out different as the one selected in the preview, and orientation dependent options, like staple and punch, were chosen, the user will be prompted to adapt the print settings and try again.
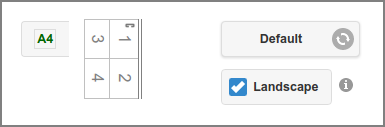
User Web App: Print - Preview (4-up, landscape, staple, punch)
Note
Print Preview can be enabled/disabled by setting
webapp.number-up-preview.enable to Y (default) or N.
3.5.2.3. Custom Text and Icons
Option text can be customized, and choices can be preceded by a 16x16 pixel icon. See IPP Localization. An example is shown below.
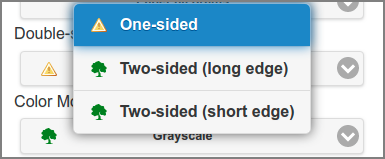
User Web App: Printer Options - Custom Icons
3.5.2.4. Printer Setting Options
The options presented in the Printer Settings dialog are a collection from:
Basic IPP Printer Attributes as shown in the table below.
Attribute |
Value source |
|---|---|
media |
CUPS (a subset of common media sizes is used). |
media-source |
CUPS or PPD Extension. |
media-type |
|
number-up |
CUPS (values 1, 2, 4, 6, 9). |
output-bin |
CUPS or PPD Extension. |
print-color-mode |
CUPS or PPD Extension. |
printer-resolution |
CUPS. |
print-scaling |
|
sides |
CUPS or PPD Extension. |
Important
User input is validated with SPConstraint rules.
3.5.3. Selected Printer
The selected Printer is shown at the top section of the dialog.
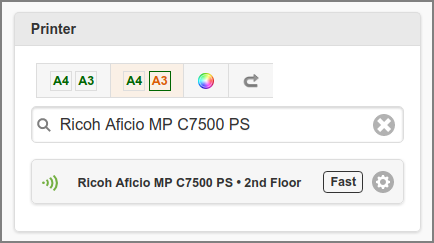
User Web App: Print - Selected Printer
The selected printer is shown as button at the bottom of the Printer section. Settings of the selected printer can be changed by pushing the button.
The Page Size Indicator is shown at the top with symbols for the main printer options:
 : color printing.
 : black and white printing.
 : duplex printing.
 : two or more pages on one sheet.
Another printer can be selected by reentering the search text (you can clear the quick search first my pushing the “cross” button at the right). If just one printer is available no search option is offered.
3.5.4. Delegated Print
The Delegated Print Invoicing option is offered in the Printer Settings and Print Job Settings dialog when the following conditions are met:
Proxy Print Delegation is enabled.
The User has Print Job Delegate role.
See Delegated Print Edit.
3.5.5. Print Job Settings
Print job settings can be entered in the Job section.
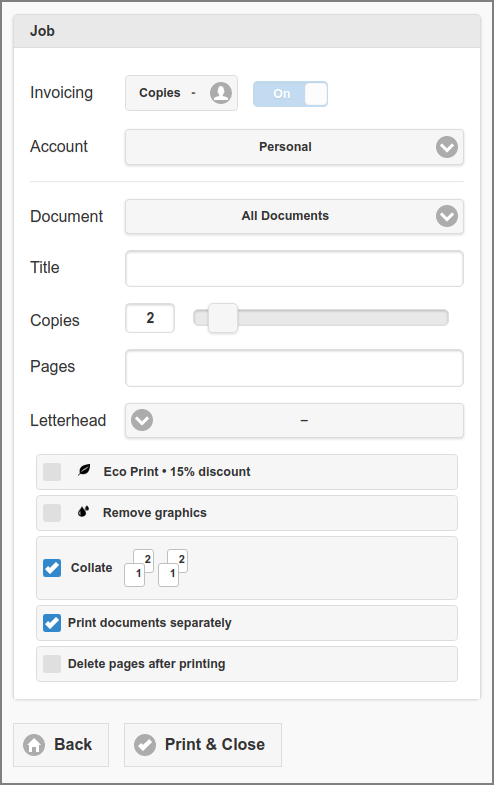
User Web App: Print - Job Settings
Select an Account to which the costs of the job is charged. The account can either be a Personal (default) or a Shared Account the user has access to. See Edit Account.
Account selection is hidden if Copies, collected by Delegated Print Invoicing, is switched
On. Availability of this switch is dependent on configuration property webapp.user.proxy-print.delegate-copies-apply-switch.Account Personal may not be available due restricted Personal Print Privileges.
If a Shared Account is selected the job will be handled as Delegated Print <ch-webapp-user-main-print-print-delegation>.
Note
If Job Ticket Labels are enabled and activated for this printer, additional labels like Domain, Application and Tag can be selected, just as in the Job Ticket Print dialog. Also see:
Selecting a Document scope and Title for your print job is identical as in Document Scope.
The number of Copies can be entered via the slider control. The “maximum number of copies per job” is set as Proxy Print Option. The number of copies is automatically reset to one (1) after printing.
Copies selection is hidden if Delegated Print <ch-webapp-user-main-print-print-delegation> Invoicing, is switched
On.If Delegated Print <ch-webapp-user-main-print-print-delegation> Invoicing is switched
Off, and a Job Ticket Printer is selected, the number of Copies is not restricted and can thus be entered as text.
A selection of SafePages to print can be entered as a range of Pages.
For example: 1-4,6,8-10,15-. The value can be a single page, a range
of pages, or a collection of page numbers and ranges separated by
commas. The pages will always be printed in ascending order, regardless
of the order of the pages in the page-ranges option. The page range is
automatically emptied after printing. Be aware that the page ordinals
are related to the Scope.
Selecting a Letterhead for your print job is identical as in User Web App: PDF - Letterhead <ss-user-pdf-letterhead>.
Depending on User Privileges the Letterhead section might not be shown.
Check one of the PDF Filters Eco Print or Remove graphics.
The Eco Print, including discount percentage, must be enabled in Eco Print Settings.
See the Configuration Properties table below on how to disable the Remove graphics filter.
The Collate option is shown if multiple copies are selected and describes how printed material will be organized. For example, if you have a five page document and print multiple copies with collate checked, SavaPage prints pages 1,2,3,4 and 5 in that order and then repeats for each copy. However, if collate is unchecked and you print three copies of those same five pages, SavaPage prints pages in this order: 111, 222, 333, 444, 555. The icons in the checkbox are a mnemonic of the output when the collate option is (un)checked.
If configuration property webapp.user.proxy-print.collate.show is
N, the Collate checkbox is hidden and SavaPage acts as if it was checked.See sheet-collate on how to specify the collate option as PPD Extension.
If the Print documents separately option is checked, each acquired document is printed as a separate job. In this way finishings (like stapling) can be applied per printed document.
This option is not shown when the acquired documents are edited (pages have been deleted or rearranged) , or the Document scope is restricted to a single document .
If this option is not checked, one (1) CUPS job is created. To separate documents on paper output, in case print is in duplex, blank filler pages are inserted in between, so the first page of a next document is on the front page of a new sheet. The same strategy is applied for single-sided n-up print jobs. However, for booklet printing this strategy is not applied.
If the option Delete pages after printing is checked, input documents or pages are deleted after the printing command is issued, and an extra option is displayed to select the deletion scope. The option is automatically reset after printing.
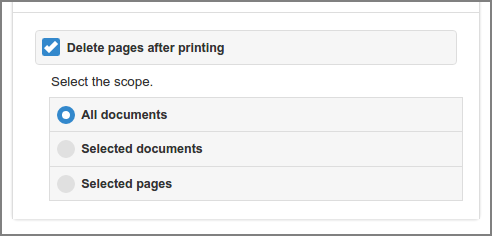
User Web App: Print - Delete Pages
All documents: all input documents are deleted.
Selected documents: documents for which pages were printed are deleted.
Selected pages: all pages selected for printing are deleted.
The Delete pages after printing option can be preset and disabled for editing in Proxy Print. In that case a fixed text, denoting the action, is (optionally) displayed instead of the checkbox.
Press the Print & Close button to validate and print the job, and close the dialog.
Tip
If webapp.user.proxy-print.confirm
configuration property
is Y the Print … button is shown to get confirmation about the costs.
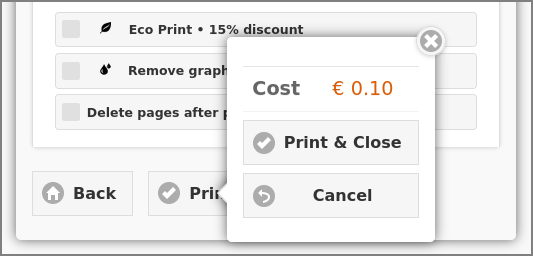
User Web App: Print Confirmation
If the job is valid, it is printed right away, unless it is a Job Ticket or if NFC Authentication is configured for the printer. In the later case the user must authenticate with an NFC card swipe to release the print job.
Important
When finishing options (staple, punch, booklet) are selected, and the orientation selected in the Print Preview differs from one of the documents to be printed, a warning message is shown telling the user to adjust print settings and try again.
The message contains information about the selected finishings, number of deviating documents, and a tailored advise.
If just one document is present (selected) for printing the advise is: “Adjust your print settings and try again”.
For multiple documents: “Clear the selection of finishing options, or print the documents separately”.
Note
In rare situations, when the host system is under heavy load, and connecting to CUPS fails, a warning message is displayed saying “The print service is currently unavailable or too busy. Please try again later.”
In the Hold Release scenario the job is held so it can be released by the user at a later time without using the User Web App.
In the Direct Print Release scenario described below the user is prompted to authenticate immediately.
Pending Job Tickets and Hold Print Jobs can be inspected and removed when needed: see Hold Print Jobs.
Warning
Job Tickets allow unrestricted printing, but printing to “regular” printers may be denied when the number of job pages exceeds a maximum. See the Proxy Print Options.
The following configuration properties apply:
Configuration property |
Description |
|---|---|
proxy-print.remove-graphics.enable |
Set to |
webapp.user.proxy-print.clear-printer |
If |
webapp.user.proxy-print.clear-delegate |
If |
webapp.user.proxy-print.collate.show |
Set to |
webapp.user.proxy-print.confirm |
If |
webapp.user.proxy-print.separate |
The default Print documents separately option value, when All documents
are selected. If |
webapp.user.proxy-print.separate.enable |
Enable the Print documents separately. If |
See Config Editor on how to set these items.
3.5.5.1. Print Archive
An extra option is offered when the Document Store for Print Archive is enabled, and the user is privileged to select the Archive. See User Privileges.
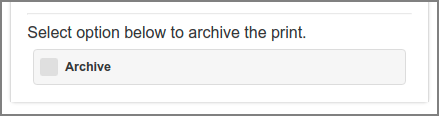
User Web App: Print Archive Option
If the user has Print Archive permission, but no permission to (de)select it, just a text is shown saying the “Print will be archived”. When explaining text is configured to be hidden, as described in the table below, the printed document will silently be archived.
Configuration property |
Description |
|---|---|
webapp.user.doc.store.archive.out.print.prompt |
Set to |
See Config Editor on how to set these properties.
3.5.5.2. Print Journal
If Print Journal is enabled and applicable for Printer and User, the Print Job is silently journalled in the Document Store.
3.5.6. Direct Print Release
If a print job is issued for a printer secured with Direct Print Release, a dialog is shown prompting the user to swipe their card to release the print job.
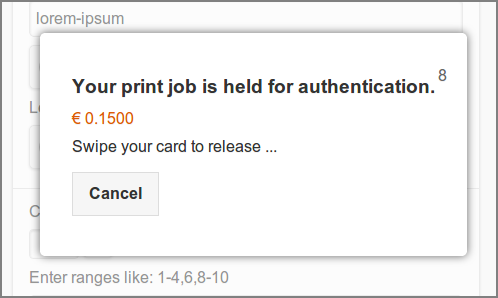
User Web App: Printer - Direct Print Release
The cost of the print job is shown in orange.
A countdown of the remaining seconds for the card swipe is shown in the top right corner of the pop-up. The time limit (seconds) is contained in configuration key
proxy-print.direct-expiry-secs. See Config Editor on how to change this value.
Note
Since the card reader will be mounted near the printer this implements a secure pull-print scenario.
3.5.7. Full Print Scope and Jobs
If a user did not rearrange or delete any SafePages and full scope is selected without a range of Pages, each input job is printed as a separate job when duplex printing is selected.
As a result the first page of new input job will always start on a new sheet. If the Title is left blank, the titles of the print jobs will correspond to the titles of the input jobs. If a Title is specified it will be used for all print jobs.
If a user did rearrange or delete any SafePages,
the scope is confined to full scope and SafePages will always be printed
as a single job. When the Title is left blank the
print job title will be generated according to the timestamp format
SavaPage-CCYY-MM-DDTHH:MM:SS.
3.5.8. Delegated Print Edit
This dialog is part of the Invoicing track, and is started from Printer Settings or Print Job Settings. It is used to edit Delegated Print.
In a Delegated Print scenario the user prints as delegate on behalf of other users, known as delegators. The result is a single job with multiple copies of a document. The total cost of the job is pro rata charged to the account of each delegator.
The Copies section at the bottom of the dialog summarizes the selected delegators from the Invoicing section at the top.
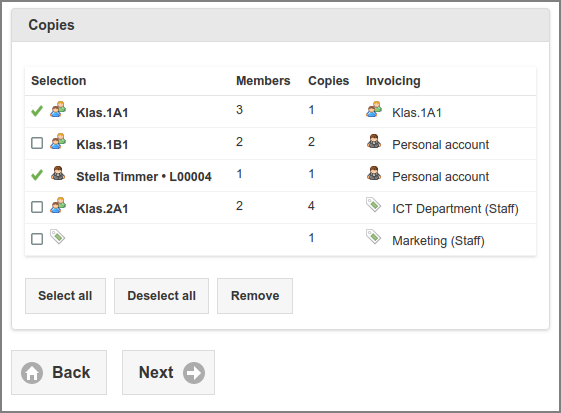
User Web App: Print Delegation Copies
Selection type is marked with one of these icons:
 : User Group.
 : Individual User.
 : Shared Account.
Each selection line shows the number of Members and Copies. The latter is the multiplication of members and the number of copies entered in the Invoicing section.
All User Group members are included, whatever their role.
Individual Users of course have just one member and have Print Job Delegator role.
Shared Account counts unspecified users. Just the number of copies is shown.
The Account column shows where printing costs are charged to:
- : Group Account.
- : Personal Account of Group Members.
- : Shared Account.
The screenshots from the Invoicing section, presented in the sections below, explain how the lines in the Copies section were created.
Remember that for items to appear on the various search list:
Groups must have Print Job Delegator role enabled.
Users must have Print Job Delegator role enabled.
Accounts must be accessible by the Delegate as member of one of the User Groups set in Account Access Control.
If a Delegate has access to a single Shared Account only, the Account search list is not displayed, and the single account is implicitly selected.
Note
Availability of the option to enter multiple number of copies is dependent on configuration property proxy-print.delegate.multiple-member-copies.enable.
Tip
Delegated Print can be integrated with PaperCut. See Delegated Print to PaperCut.
Caution
After printing, information about copies by “group/user/account” is kept in the financial data, if the cost turns out to be greater than zero. See Document List. If the printing cost is zero, all this information is lost after printing.
3.5.8.1. Group Invoicing
Select Group to invoice copies for Groups on Group Account.
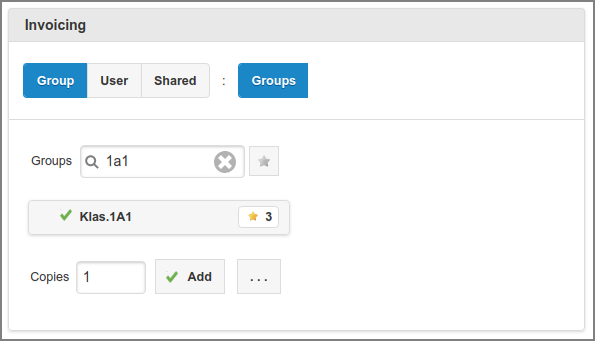
User Web App: Delegated Print - Group Invoicing
Availability of this option is dependent on configuration property
proxy-print.delegate.account.group.enable.
Enter a part of the group name in the Groups quick search field and the first chunk with matching groups will show below. Paging buttons are shown when more chunks are available.
The list shows the Group Name with the ID appended (when it is not already part of the Name).
Group quick search is on both Group Name (sorted) and ID, unless configuration item webapp.user.proxy-print.delegator-group.detail has value
NAME, so display and search is on Group Name (sorted) only , or has valueID, so display and search is on Group ID (sorted) only.
Note the star button at the left of the quick search field, and at the right of each list entry. Press the star button in a list entry to bookmark a group as “preferred”. Press the star button besides the quick search field to search for “preferred” groups only. This feature is enabled when configuration item proxy-print.delegate.groups.preferred.enable is
Y.Select one or more Groups from the list by tapping them (a green check mark sign will show at the front).
Enter the number of Copies to be printed for each group member, or press the … button to enter the total number of Group copies.
Press the Add button to add the groups as delegator.
The Group Account will be invoiced.
If configuration item
proxy-print.delegate.group-copies.enable
is Y, the … button is visible. When pressed, a pop-up shows where
the number of copies for the selected group(s) can be entered. This
feature can for instance be used when a group of 20 need only 10 copies,
because group members work in pairs.
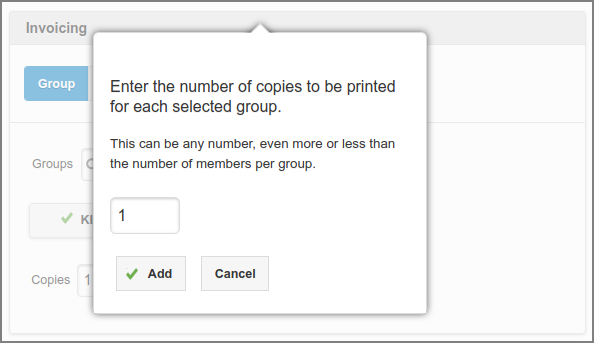
User Web App: Delegated Print - Group copies
3.5.8.2. User Invoicing for Groups
Select User to invoice copies for Groups on User Account.
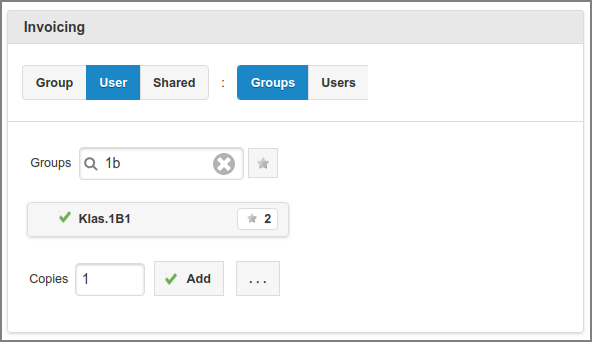
User Web App: Delegated Print - User Invoicing (Groups)
Select one or more Groups from the list.
See remarks about Group selection and display in previous section.
Enter the number of Copies to be printed for each group member.
Press the Add button to add the group members as delegator.
The Personal Account of each individual group member will be invoiced.
3.5.8.3. User Invoicing for Users
Select User to invoice copies for Individual Users on their User Account.
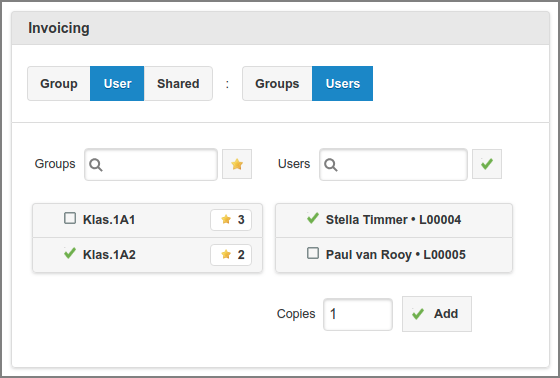
User Web App: Delegated Print - Personal Invoicing (Users)
Availability of this option is dependent on configuration property
proxy-print.delegate.account.user.enable.
Select one of the Groups to narrow down the search scope. If no group is selected the All Users built-in group is implied.
See remarks about Group selection and display in the previous section.
Search and select one or more Users from the list.
The list shows the User Name with the ID appended (when it is not already part of the Name).
User quick search is on both User Name (sorted) and ID, unless configuration item webapp.user.proxy-print.delegator-user.detail has value
NAME, so display and search is on User Name (sorted) only , or has valueID, so display and search is on User ID (sorted) only.Users can automatically be (un)selected by using the “Select All” toggle at the right-hand side of the search field.
Enter the number of Copies to be printed for the selected users, and press the Add button to add them as delegator.
The Personal Account of the selected users will be invoiced.
Note
The session user is added in the User List, even when this user does not have Print Delegator role. The session user’s Name and ID is highlighted with an orange color.
3.5.8.4. Shared Invoicing for Groups
Select Shared to invoice copies for Groups on a Shared Account.
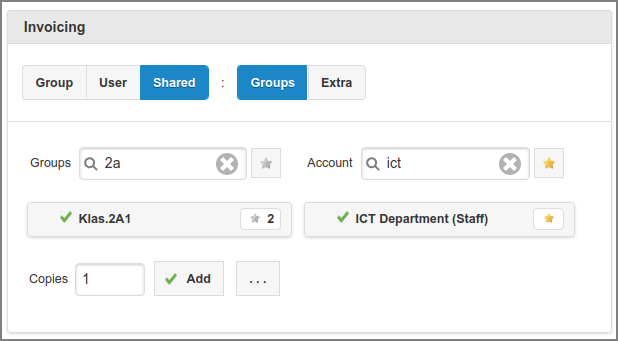
User Web App: Delegated Print - Shared Account Invoicing (Groups)
Availability of the Shared button is dependent on configuration property
proxy-print.delegate.account.shared.enable
and on Shared Account Access Control.
If the Delegate user does not have access to any shared account by User Group membership, the button will not show.
Availability of the Groups option is dependent on
proxy-print.delegate.account.shared.group.enable.
Select one or more Groups from the list.
See remarks about Group selection and display in the previous section.
Select a Shared Account.
Shared Account selection is hidden if just a single account is available.
Note the star button at the left of the quick search field, and at the right of each list entry. Press the star button in a list entry to bookmark a group as “preferred”. Press the star button besides the quick search field to search for “preferred” accounts only. This feature is enabled when configuration item proxy-print.delegate.accounts.preferred.enable is
Y.
Enter the number of Copies to be printed, and press the Add button.
The Shared Account will be invoiced.
3.5.8.5. Shared Invoicing for Extra Copies
Select Shared to invoice Extra copies on Shared Account. Availability of the Shared button is explained in the previous section.
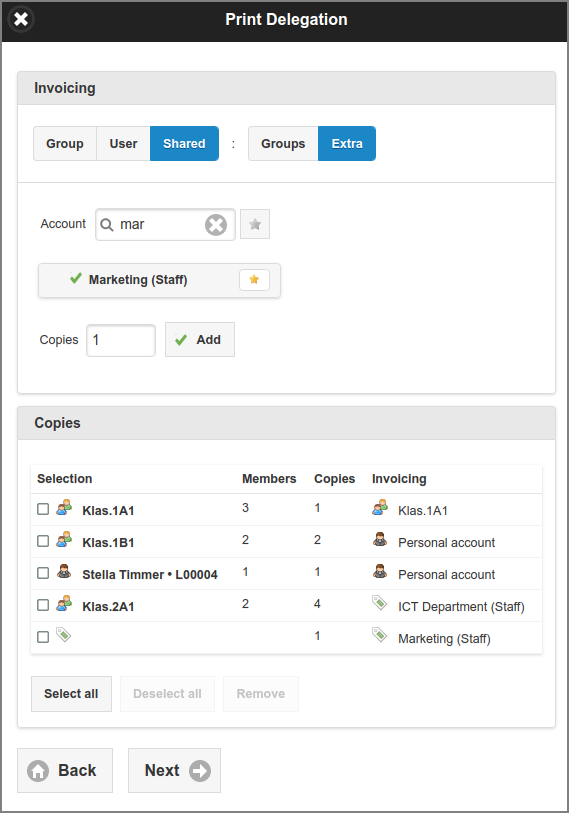
User Web App: Print - Delegated Print - Shared Account Invoicing (Extra)
Availability of this option is dependent on configuration property
proxy-print.delegate.account.shared.enable.
Select a Shared Account.
See remarks in the previous section.
Enter the number of Copies to be printed, and press the Add button.
The Shared Account will be invoiced.
As this is the last Invoicing Selection of our example, the full Delegated Print dialog is shown in the screenshot.
Note
Once Users and Groups are selected as Delegate they are disabled in the quick search list so they can’t be selected a second time.
3.5.8.6. Configuration Properties
The following Delegated Print configuration properties apply:
Configuration property |
Description |
|---|---|
proxy-print.delegate.account.group.enable |
Set to |
proxy-print.delegate.account.shared.enable |
Set to |
proxy-print.delegate.account.shared.group.enable |
Set to |
proxy-print.delegate.account.user.enable |
Set to |
proxy-print.delegate.multiple-member-copies.enable |
Set to |
proxy-print.delegate.group-copies.enable |
Set to |
proxy-print.delegate.groups.preferred.enable |
Set to |
proxy-print.delegate.accounts.preferred.enable |
Set to |
webapp.user.proxy-print.delegate-copies-apply-switch |
Set to |
webapp.user.proxy-print.delegator-user.detail |
Set to |
webapp.user.proxy-print.delegator-group.detail |
Set to |
See Config Editor on how to set these items.
3.5.9. Job Ticket Print
If Job Ticket Printer instances are present,
users with role Job Ticket Creator can select the
marked printers.
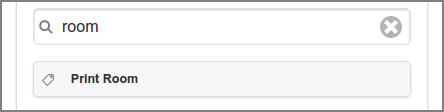
User User Web App: Print - Select Job Ticket Printer
By default, Job Tickets are of Type Print.
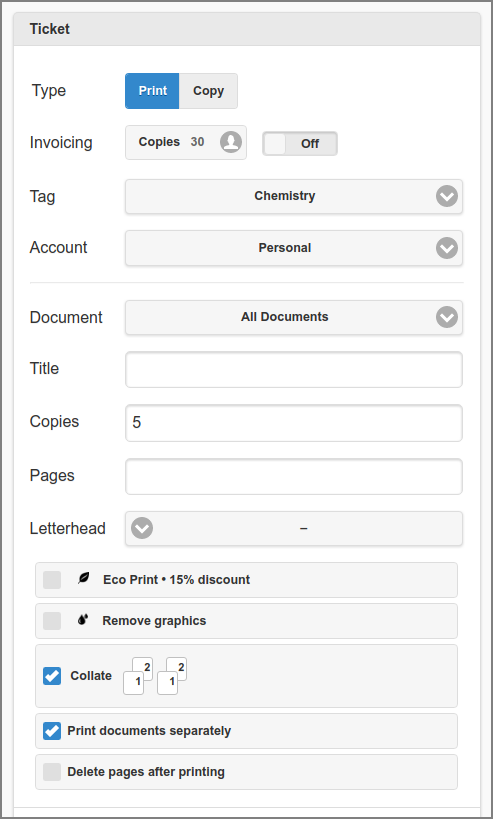
User Web App: Print - Job Ticket Settings - Print
All options for a regular print job apply.
The Tag item is a label for Job Tickets. Additional Domain and Application (use) labels can be configured, as shown in screenshot below. See the next section on how to configure these items.
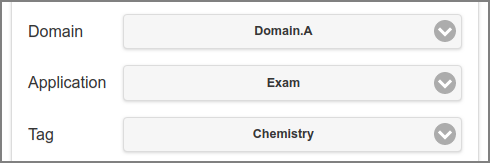
User Web App: Print - Job Ticket Settings - Labels
Note
The last selected Domain label is saved, and used as default in
future user session. You can disable this behavior by setting
configuration property jobticket.domains.retain to N.
See Configuration Properties.
Note
If the Title of the Ticket is not specified, SavaPage will compose one, based on the Document title(s). In this way extra identifying data will be available.
If a single document is selected the Title will default to the name of this document. When the Title is left empty, SavaPage will compose one, based on the Document name(s). In this way identifying data will be available.
If configured as such, Job Tickets can also be used for Copy requests. All printer settings of a regular proxy print apply, as well as some job options. However, SafePages are not needed, and no PDF document will be attached to the ticket.
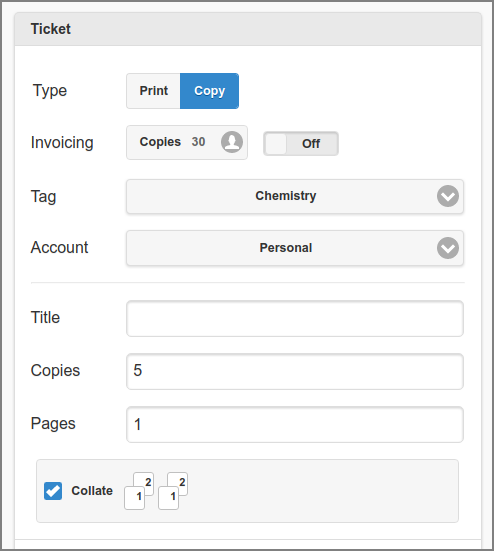
User Web App: Print - Job Ticket Settings - Copy
Users can enter a Time of delivery and Remarks. Valid delivery days are displayed at the right. Press the reset icon on the left to reset the time to the default.
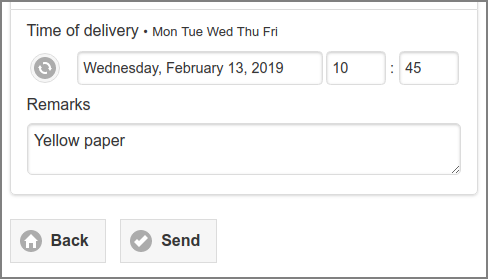
User Web App: Print - Job Ticket Settings
Note
The default Time of delivery and its reset button are not displayed if configuration property jobticket.delivery-days is 0 (zero).
After the ticket is sent, the issued Ticket Number is displayed, and the user can view the Job Ticket on the Hold Print Jobs list.
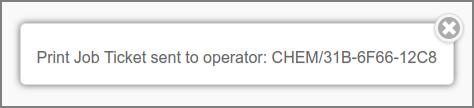
User Web App: Print - Job Ticket - Sent
In case of a Copy Job, the user will add a note with the Ticket Number to the hard copy original, before handing it to the Job Ticket operator, who will use it for off-the-glass copying according to the specs in the job ticket.
A Job Ticket is printed on a central queue and is handled and released by users with role Print Job Operator in a specialWeb App. See Job Tickets Web App. If the Job Ticket is printed or canceled, the user is optionally notified by email.
The following configuration properties apply:
3.5.9.1. Configuration Properties
Configuration property |
Description |
|---|---|
Delivery
|
|
jobticket.delivery-datetime.enable |
Set to |
jobticket.delivery-time.enable |
Set to |
jobticket.delivery-days |
Default value of the date part of Time of delivery as days-of-week count after ticket creation date (default = 1). If value is 0 (zero), the date part default and its reset button are not displayed. |
jobticket.delivery-days-min |
Minimal value of the date part of Time of delivery as days-of-week count after ticket creation (default = 1). |
jobticket.delivery-days-of-week |
CRON expression with valid delivery dates as days-of-week range (default: MON-FRI). |
jobticket.delivery-day-minutes |
Default value of the time part of Time of delivery on delivery days as minutes after midnight (default: 510). For instance: 8h30m = 8*60+30 = 510. |
Copy Job
|
|
jobticket.copier.enable |
Set to |
Email notification
|
|
jobticket.notify-email.completed.enable |
|
jobticket.notify-email.canceled.enable |
|
Domain labels
|
|
jobticket.domains |
A comma separated list of Job Ticket domains to be applied as job ticket number prefix.
Each tag on the list is formatted as |
jobticket.domains.enable |
Set to |
jobticket.domains.required |
Set to |
jobticket.domains.retain |
Set to |
Application labels
|
|
jobticket.uses |
A comma separated list of Job Ticket applications (uses) to be applied as
job ticket number prefix. Each tag on the list is formatted as |
jobticket.uses.enable |
Set to |
jobticket.uses.required |
Set to |
Tag labels
|
|
jobticket.tags |
A comma separated list of Job Ticket tags to be applied as job ticket number prefix.
Each tag on the list is formatted as |
jobticket.tags.1 |
An extension of configuration property |
jobticket.tags.enable |
Set to |
jobticket.tags.required |
Set to |
See Config Editor on how to set these items.